


Level 0-Introduction
To get started building apps in Web3, we need some background knowledge of Web2. There are a lot of topics that are certainly covered within web2 that are highly useful in Web3. For example, if you make a smart contract, you still need to provide your users a way to interact with that smart contract. You can do this by building a website or application that allows the user to interface with the smart contract in an easy manner. Additionally, you may also want to store some user data or other data outside the smart contract. These concepts are the exact same as Web2, the only thing that changes is that we will be using and interfacing with a smart contract in the background.
Frontend Technologies
Frontend is the interface with which a user interacts. On the web, the frontend refers to a website you can browse around. Mobile apps, and desktop apps, are also examples of valid frontend interfaces. For the purposes of this course, we will focus on the web, and develop frontend interfaces using web technologies such as HTML, CSS, and Javascript.
Backend Technologies
The backend refers to that part of a software that allows it to operate and cannot be (necessarily) accessed by the user directly. Most private data, user data, business logic, data processing, etc happens on the backend, whereas the frontend is just used to offer a visual representation of that data and allow the user to perform certain tasks with it. The backend receives requests from the clients and contains the logic to send the appropriate data back to the client. Backend services can be written in a variety of programming languages - Python, Java, Javascript, Go, Rust, etc.
On the web, frontend websites typically send requests over the internet through HTTP to a backend server, asking for certain data or asking it to perform a certain task, and the backend registers the request and sends a response back. For the purposes of this course, we will be developing our backends in Javascript as well, to be able to reuse code and share knowledge between the frontend and backend.
Required Readings:
- What is a backend?
- Building an API with Node.js and Express
- Building an API connected to a database in Node.js
Before you move on to the actual web3 specific content, please ensure you have some familiarity with the following:
- HTML
- CSS
- Javascript
- Node.js
- React
You can learn them in parallel if you want to, but having background knowledge will definitely help! Especially as you continue on tracks beyond Freshman.
Level 1 - What is Blockchain?
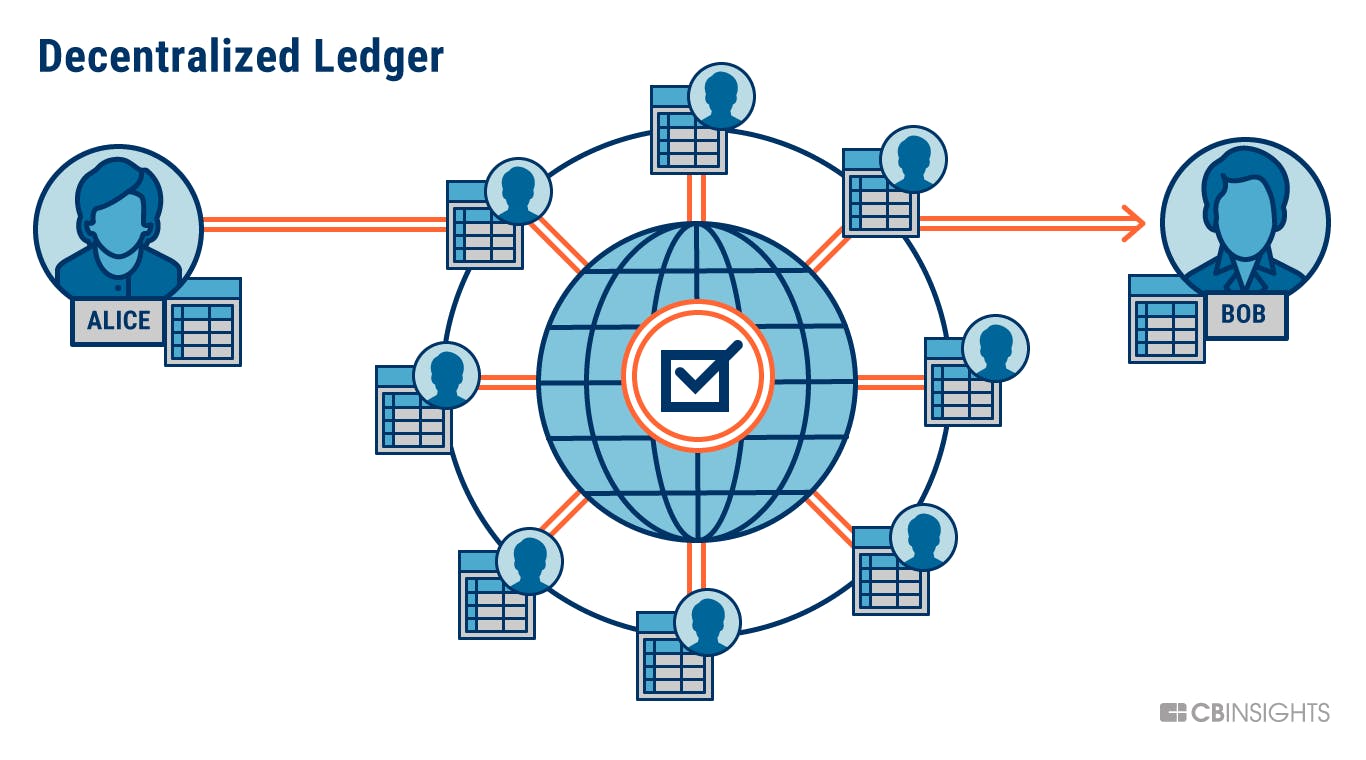
A blockchain is a shared, distributed, and permanent database shared among multiple nodes on a computer network. They record data in a way that makes it probabilistically impossible to modify or hack the system.
Specifically, like its namesake, blockchains record data as a chain of blocks. Each block contains a group of transactions, which could be transferring assets around the network, or updating the information stored on the blockchain.
Blockchains were popularized by the anonymous person (or group) Satoshi Nakamoto, when they released the Bitcoin Network in 2008. Bitcoin is a cryptocurrency network, and it handles primarily the transfer of the BTC asset across the network, without a trusted middleman or authority, while ensuring the network itself is secure and cannot be hacked. (P.S. The bitcoin network is also likely the biggest bug bounty in the world - if you can hack it, you're an instant trillionaire).
Over time, this design of Bitcoin inspired other, more capable, blockchain networks to come out, like Ethereum. We will be learning a lot about Ethereum in the coming sessions.
State Management
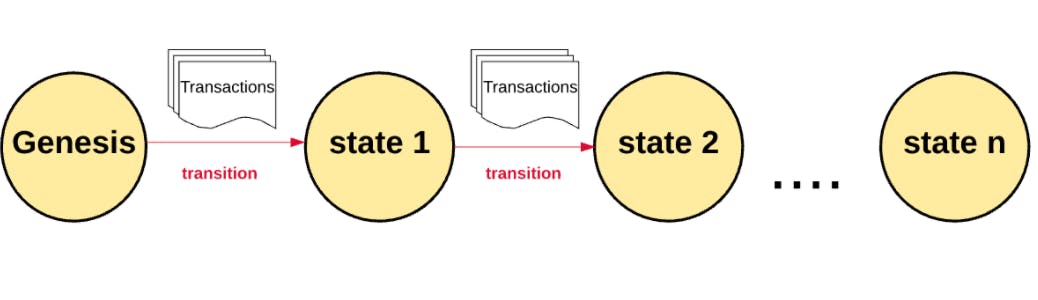
Blockchains start off with a Genesis State when they launch. Bitcoin's genesis state happened in 2009 when the public network launched. Ethereum's Genesis State happened in 2015, when it launched.
Every transaction on a blockchain modifies the global state that is replicated across all nodes.
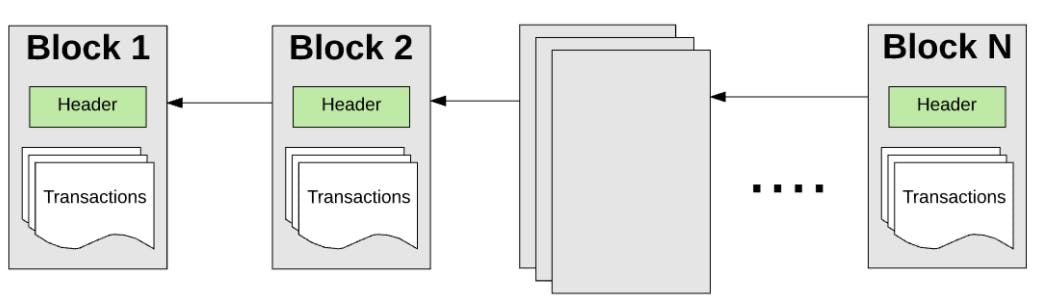
Since there are millions of transactions, transactions get grouped together in blocks. Hence the name. These blocks are chained together in a cryptographically verifiable way so they are historically traceable. The current state of a network can be recalculated at any time by starting from the genesis block and transitioning the state according to each block's information up until now.
Nodes
A blockchain network is managed autonomously through a peer-to-peer distributed network of computer nodes. Without going into too much detail, you can simply think of each node in the network as keeping a copy of the global transaction ledger. Therefore, each node can individually verify and audit transactions happening on the network and ensure there was no illicit behaviour. Another type of node, called a mining node, is responsible for grouping together new transactions being made on a network into a block, and proposing the block to be included onto the global ledger by everyone else. Mining is computationally hard, and very important to do securely, so miners whose blocks get accepted are given a token reward for their hard work.
The use of a blockchain confirms that each unit of value was transfered only once, and the ingenious mechanisms put forth by Satoshi Nakamoto solved the long-standing decentralized double-spending problem.
Decentralization
By storing data in a peer to peer network of nodes, the blockchain is a decentralized network. This has significant benefits over the traditional approach of storing data in a centralized manner. There are significant examples of problems with centralization - a few of which we will list here:
Data breaches in centralized systems expose lot of data Centralized authorities can censor and shut down speech Reliance on a central authority means upstream problems affect downstream consumers (e.g. AWS going down means most of the internet goes down with it) On the other hand, decentralization brings about the opposite benefits.
No censorship as there is no single authority or middleman that can censor you No downtime as the overall network is running across 1000's of nodes across the globe Highly attack resistant making it infeasible to manipulate or destroy data
Use Cases
- Cryptocurrency
- Smart Contracts
- Decentralized Finance
- Gaming
- Supply Chain Tracking
- Counterfeiting Protection
- Data Privacy
- Decentralized Governance
- Verifiable ownership of assets and many more...
Level 2 - What is Web3?
It’s probably most helpful to think about Web3 in the context of previous internet paradigm ie; Web2.
Web2 is the version of the internet most of us know and use today. Where Web1 was static and “read-only,” Web2 is “read-write,” and interactive. Under Web2, the internet became more usable: web2 was dynamic and users could consume, interact with, and create content on the internet themselves.
Along the way, the internet became largely dominated by the four behemoths we know today as Apple, Amazon, Facebook, and Google. Web2 also saw an explosion in the use of smartphones, and most of internet use was through mobile apps and hardware built by these companies. While this meant more people could participate in the internet, it also meant the internet was becoming increasingly controlled by the leading digital platforms.
Why is this a problem? In the centralized internet we know today, Apple can take a 30% cut on all paid-app downloads and in-app purchases, Twitter and Facebook can de-platform the POTUS, and the everyday consumer has less privacy, security, and control over their online information than ever before.
We also see a lot of data breaches happening all across web2 leading to reduced security and privacy for one's personal data. When a user's data gets breached its easy for them to become a victim of identity theft, personal attacks etc.
So now what is Web3?
Web3, the future internet we’re moving towards, is a decentralized internet. Under Web3, the internet is shared online and governed by the collective “we,” rather than owned by centralized entities. The Web3 world is one that has open-source protocols at its foundation. Web3 is about rearchitecting internet services and products so that they benefit people rather than entities.
Web3 enhances the web we know today by making it decentralized, distributed, open, trustless and permissionless.
It is getting built such that everything would happen in a decentralized distributed way giving no central authority access to control the system. ‘Open’ as it would be open sourced software built by an open and accessible community of developers and executed in full view of the world. ‘Trustless’ in that the network itself allows participants to interact publicly or privately without a trusted third party. ‘Permissionless’ in that anyone, both users and suppliers,can participate without authorisation from a governing body.
Level 3 - What is ETH
1. Theory
What is Ethereum Ethereum is a decentralized blockchain that supports smart contracts. Unlike Bitcoin, which only supports the transfer of the Bitcoin token around the network, Ethereum is more general purpose.
Developers can build dApps, or decentralized applications, which can be executed on the Ethereum network. The global state of Ethereum, therefore, consists of more than just the balance of every account, but also the state of each dApp.
dApps are built on Ethereum using its programming language, Solidity. You can write smart contracts using Solidity and deploy the smart contracts to the Ethereum Network.
It maintains consensus across all the computers in its network with Proof of Work (PoW). In the near future, Ethereum will be moving to a Proof of Stake (PoS) mechanism.
Ethereum Basics
History
Ethereum was originally proposed by Vitalik Buterin, a young programmer and co-founder of Bitcoin Magazine. Buterin used to argue with the Bitcoin core developers that the blockchain technology can have a much wider impact than just monetary exchanges and blockchain needed a general-purpose programming language to go with it.
When he failed to make any changes there, he went ahead and proposed the development of a new blockchain platform with a Turing-complete programming language (Solidity), that went on to be what we know as Ethereum.
What is Ether
Ethereum has a native currency called "Ether", or "Eth". This token is required to pay transaction fees for transactions done on the Ethereum network.
What are Smart Contracts
Smart contracts are small computer programs that are replicated and processed on all the computers on the Ethereum network without a central coordinator. Smart Contracts allow you to program contracts that can be automatically enforced by computer code.
The general-purpose nature of Ethereum allows for any number of possible applications to be built on top of it, which all inherit the security and decentralization benefits that come from running on the Ethereum blockchain.
ERC20 Tokens In addition to Ether, people can create and use their own currencies on Ethereum. The most common form of currency is ERC20 tokens. ERC20 Tokens are smart contracts that fit a specific standard. Developers can extend beyond the standard, but should meet the minimum requirements when making their own token. The standardization allows for digital wallets to easily support all types of tokens, without needing specialized code for each token created.
ERC721 and ERC1155 Tokens These are what are also called NFTs. These two standards, similar to ERC20, provide a base line for what requirements should be met when creating NFTs. They provide similar benefits as well, allowing wallets and NFT marketplaces to instantly be compatible with all NFT collections as they all follow one of these two standards.
and many more...
Level 4 - Crypto-Wallets
In this module you will learn about what are Crypto Wallets and how to download one.
What is an address?
An address is a string of text generated using cryptography to represent your account on the blockchain. You can send and receive funds and can also interact with other applications using your address. An example of an Ethereum address is: '0x01573Df433484fCBe6325a0c6E051Dc62Ab107D1'
What are private keys?
A private key is like a password that contains a bunch of letters and numbers that allow you to manage the crypto held by your address.
An example of a private key is: 'E9873D79C6D87DC0FB6A5778633389F4453213303DA61F20BD67FC233AA33262'
Address is the username of your account if you consider private key as the password. Thats why its okay if someone’s knows your address but keep your private key safe.
Caution: Even though a private key acts like your password, only you have access to your private key. If you lose your private key or share it with someone malicious your crypto cant be recovered. There is no way to do forgot password, change password or catch the thief in crypto.
What is a seed phrase?
A seed phrase is a series of words generated by your cryptocurrency wallet that give you access to the crypto associated with that wallet. Think of a wallet as being similar to a password manager for crypto, and the seed phrase as being like the master password. An example of a seed phrase is: 'dove lumber quote board young robust kit invite plastic regular skull history'
What is a crypto wallet?
Crypto wallets manage the private keys for your addresses They also allow you to send, receive crypto and interact with many blockchain apps. You can consider your crypto wallet as a password manager then seed phrase is the master password for your password manager and your multiple addresses and private keys are your username and passwords.
What is MetaMask?
An hot Ethereum crypto wallet which you can install as a browser extension or a mobile app. It helps you interact with Ethereum Apps.
- What is MetaMask - Begineer's Guide
- Download MetaMask(Highly Recommended!)
- How to use MetaMask
Other Alternatives
Level 5 - Remix IDE
Remix is an open-source, web and desktop IDE for Ethereum development. It is the easiest development tool to get started with building on Ethereum, and has a huge collection of plugins to extend its experience.
Remix helps you write Solidity code directly in the browser, and has tools for testing, debugging, and deploying your smart contract to the blockchain.
You can visit Remix at remix.ethereum.org
Navigating Remix
When you first open Remix, you will be greeted with a screen like this.
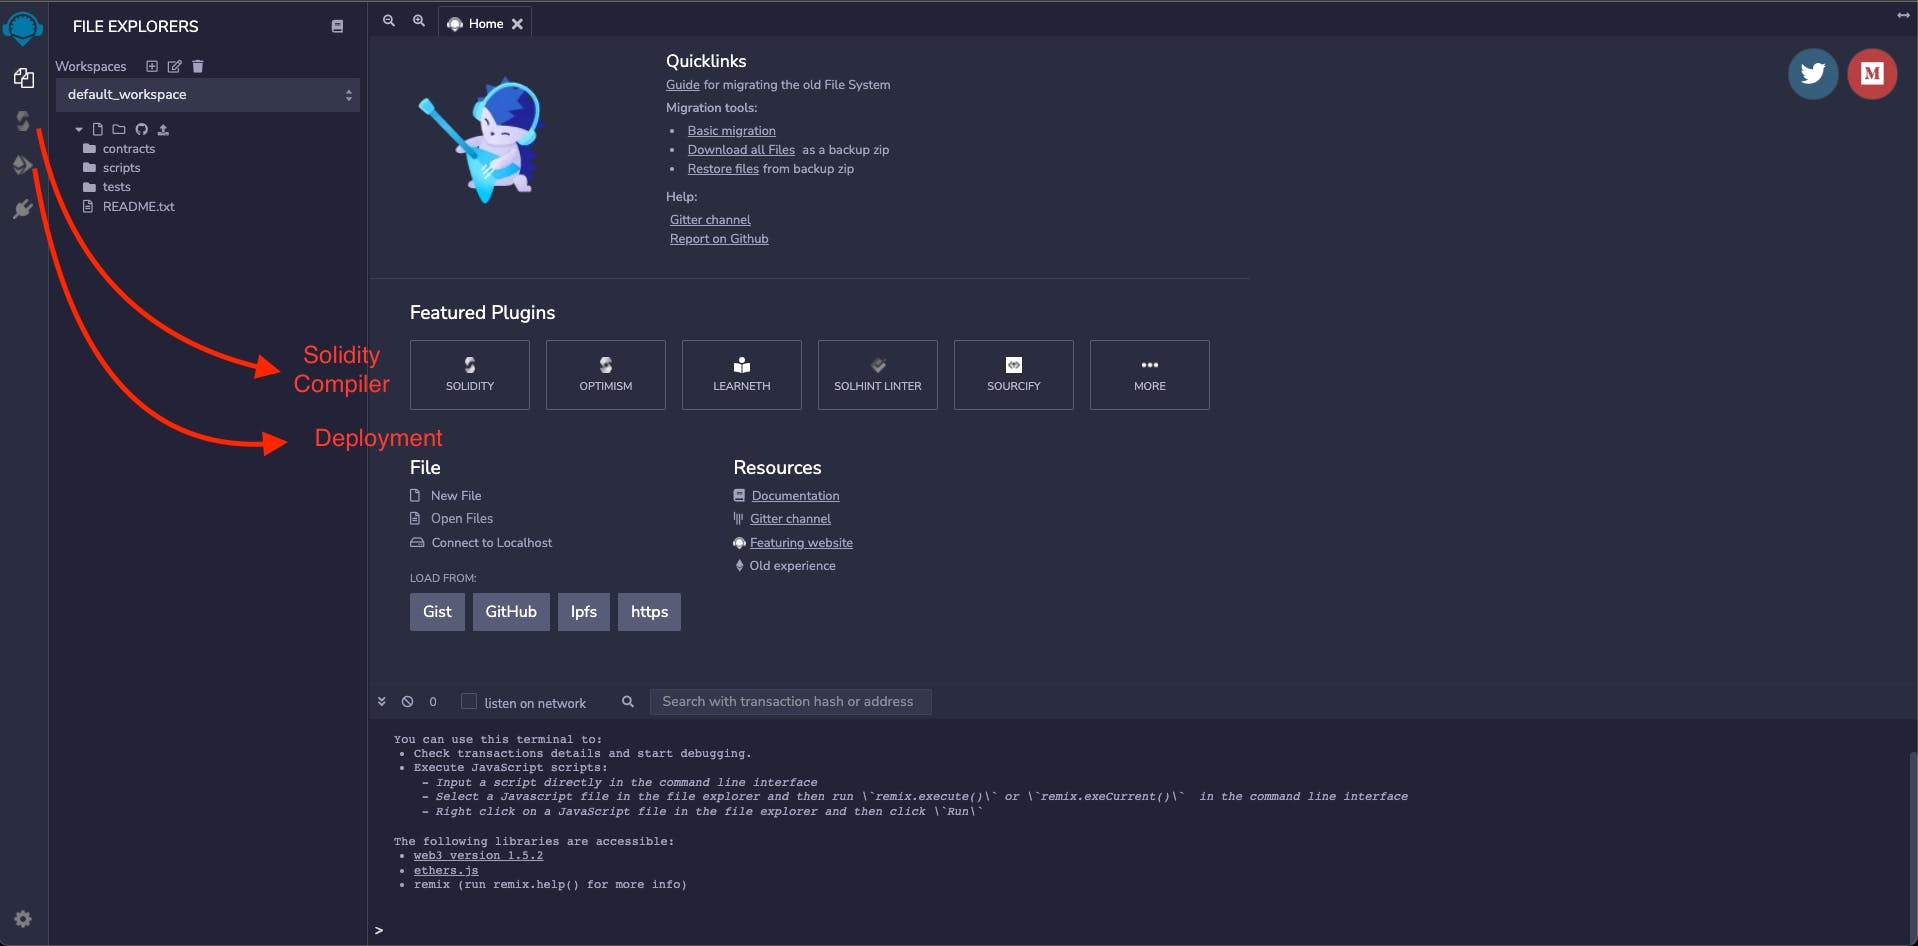
In the left sidebar, you can switch between the 'File Explorer', the 'Solidity Compiler', the 'Deployer', and an 'Extensions' panel.
In the bottom, there is an output panel, which displays output from your compilation, your deployments, and your function calls.
In the middle is where you will edit the code. Currently, it displays the home screen of the IDE, but once we open a file it will become the code editor.
###Remix Workflow In the sidebar, if you look under the 'contracts' folder - Remix ships with 3 basic smart contracts to help people learn Solidity. Let's take a look at '1_Storage.sol'.
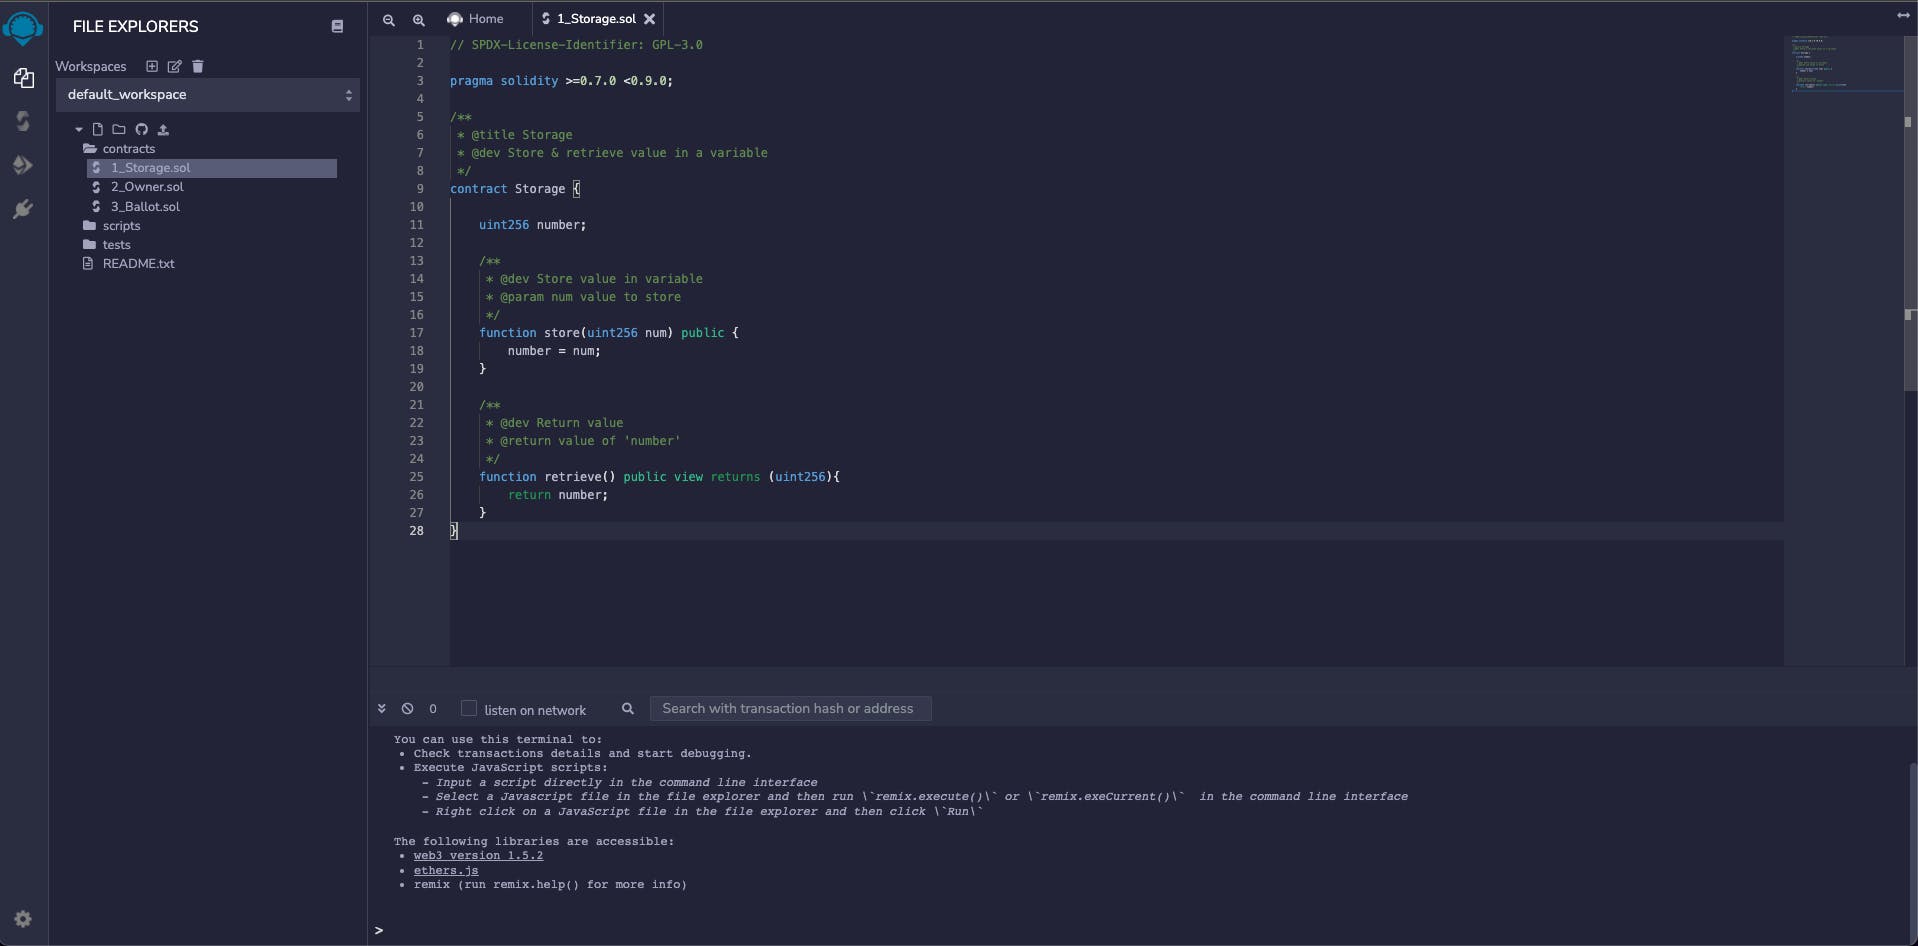
We can see the code editor now.
In the file explorer, we can also see options to create a new file or directory, upload local files, or import files from Github.
To compile our contracts, we shift over to the 'Solidity Compiler' tab, and we will see something like this in the sidebar.
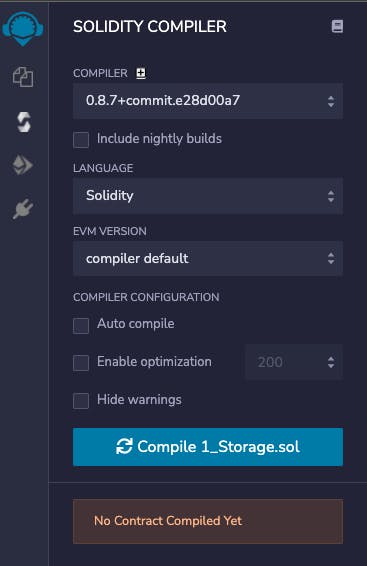
Here, we can choose which Compiler Version we want, which smart-contract programming language we are using (mostly you will just be using Solidity), and some further configuration options.
Note: The other programming language listed in Remix, 'Yul', is a lower-level language. It is meant for intermediate compilation, and is closer to the hardware than Solidity is. 99% of the time you will not be coding in Yul. Read more about Yul here - docs.soliditylang.org/en/v0.8.9/yul.html
Clicking 'Compile 1_Storage.sol' will compile the contract and make it ready for deployment.
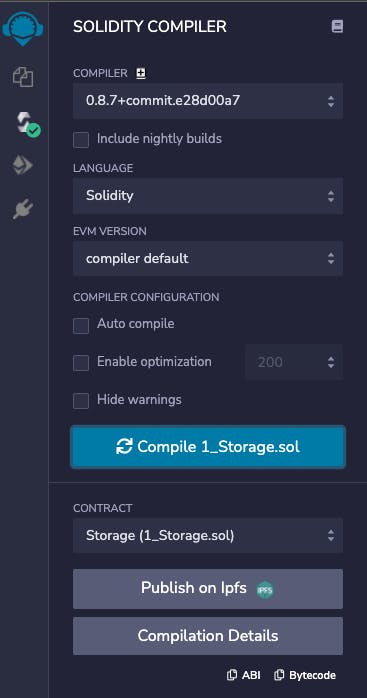
Moving over to the 'Deployment' tab, we will see something like this in the sidebar.
First thing to note here is the 'Environment'. Remix ships with a 'Javascript VM' - which is a simulator of the Ethereum Virtual Machine (EVM) in the browser. This allows for fast testing and debugging of your smart contract, as long as your contract doesn't depend on another contract deployed to a real Ethereum network. Thankfully, our Storage contract does not, so we can test it right here in the Javascript VM.
To deploy to actual networks, we will want to change our 'Environment' to one of the other options listed there (more on this later).
Along with the 'Javascript VM', Remix creates a set of fake accounts, all loaded up with 100 ETH, to test with.
Select the '1_Storage.sol' contract from the dropdown, and click Deploy to deploy the contract.
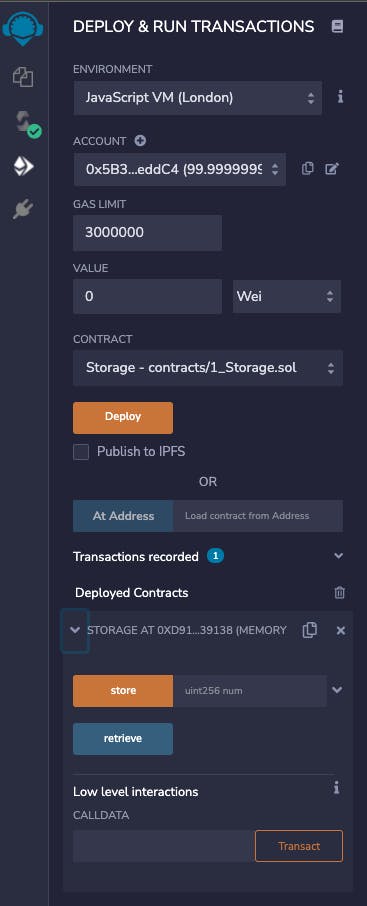
Once the contract is deployed, you will see it under the 'Deployed Contracts '**section - where you can now call functions on your smart contract.
Calling the 'retrieve' function will return a value of '0' right now, which is the default value for integers in Solidity.
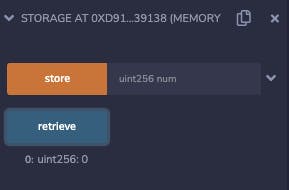
Also, we will see in the Output panel some logs about the call to 'Storage.retrieve' which is our function.
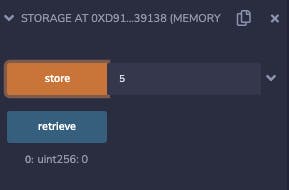
Now, let's try calling the 'store' value with the number '5'.

Again, we see some logs in the output panel about the call to 'Storage.store'. Now, if we try to retrieve again, the output will be '5'.
NOTE - None of these function calls/transactions we made opened up your digital wallet (metamask). This is because we are testing in the Javascript VM currently, and that is just a simulator working with fake accounts. When deploying to a real network (Testnet or mainnet), transactions need to be confirmed and signed through your digital wallet.
Recommended
To learn more about Remix, we recommend:
- Go through the documentation atRemix IDE Docs
- Play around with the default smart contracts that Remix ships with to get a handle on the workflow
Level 6 - Solidity
In this module you will learn what is Solidity and its basics
What is Solidity ?
Solidity is an object-oriented, high-level language for implementing smart contracts. It is designed to target Ethereum Virtual Machine(EVM) It is statically typed, supports inheritance, libraries and complex user-defined types among other features.
Building in Solidity
Initializing smart contracts
// Define the compiler version you would be using
pragma solidity ^0.8.10;

// Start by creating a contract named HelloWorld
contract HelloWorld {

}
Variables and types
There are 3 types of variables in Solidity
Local
- Declared inside a function and are not stored on the blockchain
State
- Declared outside a function to maintain the state of the smart contract
- Stored on the blockchain
Global
- Provide information about the blockchain. They are injected by the Ethereum Virtual Machine during runtime.
- Includes things like transaction sender, block timestamp, block hash, etc.
- Examples of global variables
The scope of variables is defined by where they are declared, not their value. Setting a local variable's value to a global variable does not make it a global variable, as it is still only accessible within it's scope.
// Define the compiler version you would be using
pragma solidity ^0.8.10;

// Start by creating a contract named Variables
contract Variables {
    /*
        ******** State variables **********
    */
    /*
    uint stands for unsigned integer, meaning non negative integers
    different sizes are available. Eg
        - uint8   ranges from 0 to 2 ** 8 - 1
        - uint256 ranges from 0 to 2 ** 256 - 1
    `public` means that the variable can be accessed internally
     by the contract and can also be read by the external world
    */
    uint8 public u8 = 10;
    uint public u256 = 600;
    uint public u = 1230; // uint is an alias for uint256

    /*
    Negative numbers are allowed for int types. Eg
    - int256 ranges from -2 ** 255 to 2 ** 255 - 1
    */
    int public i = -123; // int is same as int256

    // address stands for an ethereum address
    address public addr = 0xCA35b7d915458EF540aDe6068dFe2F44E8fa733c;

    // bool stands for boolean
    bool public defaultBoo1 = false;

    // Default values
    // Unassigned variables have a default value in Solidity
    bool public defaultBoo2; // false
    uint public defaultUint; // 0
    int public defaultInt; // 0
    address public defaultAddr; // 0x0000000000000000000000000000000000000000

    function doSomething() public {
        /*
        ******** Local variable **********
        */
        uint ui = 456;

        /*
        ******** Global variables **********
        */

        /*
            block.timestamp tells us whats the timestamp for the current block
            msg.sender tells us which address called the doSomething function
        */
        uint timestamp = block.timestamp; // Current block timestamp
        address sender = msg.sender; // address of the caller
    }
}
Functions, Loops and If/Else
// Define the compiler version you would be using
pragma solidity ^0.8.10;

// Start by creating a contract named Conditions
contract Conditions {
    // State variable to store a number
    uint public num;

    /*
        Name of the function is set.
        It takes in a uint and sets the global variable num.
        It is a declared as a public function meaning
        it can be called from within the contract and also externally.
    */
    function set(uint _num) public {
        num = _num;
    }

    /*
        Name of the function is get.
        It returns the value of num.
        It is declared as a view function meaning
        that the function doesnt change the state of any variable.
        View functions in solidity do not require gas.
    */
    function get() public view returns (uint) {
        return num;
    }

    /*
        Name of the function is foo.
        It takes in  uint and returns an uint.
        It compares the value of x using if/else
    */
    function foo(uint x) public returns (uint) {
        if (x < 10) {
            return 0;
        } else if (x < 20) {
            return 1;
        } else {
            return 2;
        }
    }

    /*
        Name of the function is loop.
        It runs a loop till 10
    */
    function loop() public {
        // for loop
        for (uint i = 0; i < 10; i++) {
            if (i == 3) {
                // Skip to next iteration with continue
                continue;
            }
            if (i == 5) {
                // Exit loop with break
                break;
            }
        }
    }
}
Arrays, Strings Array can have a compile-time fixed size or a dynamic size.
pragma solidity ^0.8.10;

contract Array {

    // Declare a string variable which is public
    string public greet = "Hello World!";
    // Several ways to initialize an array
    // Arrays initialized here are considered state variables that get stored on the blockchain
    // These are called storage variables
    uint[] public arr;
    uint[] public arr2 = [1, 2, 3];
    // Fixed sized array, all elements initialize to 0
    uint[10] public myFixedSizeArr;
    /*
        Name of the function is get
        It gets the value of element stored in an array's index
    */
    function get(uint i) public view returns (uint) {
        return arr[i];
    }

    /*
     Solidity can return the entire array.
     This function gets called with and returns a uint[] memory.
     memory - the value is stored only in memory, and not on the blockchain
              it only exists during the time the function is being executed

     Memory variables and Storage variables can be thought of as similar to RAM vs Hard Disk.
     Memory variables exist temporarily, during function execution, whereas Storage variables
     are persistent across function calls for the lifetime of the contract.
     Here the array is only needed for the duration while the function executes and thus is declared as a memory variable
    */
    function getArr(uint[] memory _arr) public view returns (uint[] memory) {
        return _arr;
    }

     /*
        This function returns string memory.
        The reason memory keyword is added is because string internally works as an array
        Here the string is only needed while the function executes.
    */
    function foo() public returns (string memory) {
        return "C";
    }

    function doStuff(uint i) public {
        // Append to array
        // This will increase the array length by 1.
        arr.push(i);
        // Remove last element from array
        // This will decrease the array length by 1
        arr.pop();
        // get the length of the array
        uint length = arr.length;
        // Delete does not change the array length.
        // It resets the value at index to it's default value,
        // in this case 0
        delete arr[index];
        // create array in memory, only fixed size can be created
        uint[] memory a = new uint[](5);
        // create string in memory
        string memory hi = "hi";
    }

 }
References
Resources for learning extra
- Cryptozombies
- Solidity by Example
- Solidity docs # Level 7 - Create An Ethereum Dapp with Ethers.js
(Forked from BlockDevsUnited/BasicFrontEndTutorial) This is a step-by-step tutorial on how to create a front end, deploy a Solidity smart contract, and connect them together. We will use Metamask, Remix IDE and Ethers.js.
By the end of this tutorial you will be able to create a simple HTML front end with buttons that can interact with smart contract functions. The tutorial takes place in 3 stages
- Create a basic HTML web page
- Create a basic Solidity smart contract
- Connect the web page with the smart contracts using Ethers.js.
Prefer a Video?
If you would rather learn from a video, we have a recording available of this tutorial on our YouTube. Watch the video by clicking on the screenshot below, or go ahead and read the tutorial!
Preparation
1.Download and InstallMetaMask
Never used Metamask? Watch this explainer video
The important bits for us are:
1:06 to 4:14Click Ethereum Mainnet in the top. Change to the Ropsten Tesnet and get a copy of the account's public address on your Metamask Wallet.
2.Request some Ropsten Tesnet Ether from a faucet loaded into your Metamask Wallet.
3.Install a http server. Use any you like, but we recommend lite-server for beginners:
- Install Node.js (Download and Instructions)
- Install lite-server (with NPM in a terminal/command prompt):
npm install -g lite-server #install lite-server globally
Create and Serve a Simple Webpage
The first step is to create a basic HTML page.
- Create a new folder (directory) in your terminal using
mkdir <directory name> - In a code editor (e.g. Atom, or Visual Studio Code), open the folder
- Create a new file called
index.html - Open index.html
- Create HTML boilerplate
<!DOCTYPE html>
<html lang="en">
<head>
 <meta charset="UTF-8" />
 <meta http-equiv="X-UA-Compatible" content="IE=edge" />
 <meta name="viewport" content="width=device-width, initial-scale=1.0" />
 <title>My First dApp</title>
</head>
<body></body>
</html>
6.Inside the body tag, add some text, a label and input.
<body>
  <div>
    <h1>This is my dApp!</h1>
    <p>Here we can set or get the mood:</p>
    <label for="mood">Input Mood:</label> <br />
    <input type="text" id="mood" />
  </div>
</body>
7.Inside the div tag add some buttons.
<button onclick="getMood()">Get Mood</button>
<button onclick="setMood()">Set Mood</button>
OPTIONAL: Inside the <head> tag, add some styles to make it look nicer
<style>
  body {
    text-align: center;
    font-family: Arial, Helvetica, sans-serif;
  }

  div {
    width: 20%;
    margin: 0 auto;
    display: flex;
    flex-direction: column;
  }

  button {
    width: 100%;
    margin: 10px 0px 5px 0px;
  }
</style>
8.Serve the webpage via terminal/command prompt from the directory that has index.html in it and run:
9.Go to [http://127.0.0.1:3000/](http://127.0.0.1:3000/) in your browser to see your page!

10.Your front end is now complete!

### Create a Basic Smart Contract
Now it's time to create a Solidity smart contract.

1.You can use any editor you like to make the contract. For this tutorial we recommend the online IDE [Remix](https://remix.ethereum.org/#optimize=false&runs=200&evmVersion=null&version=soljson-v0.8.7+commit.e28d00a7.js)
- Never used Remix before? Checkout [This video](https://www.youtube.com/watch?v=pdJttvcAV1c)
2.Go to Remix

3.Check out the "Solidity Compiler", and "Deploy and Run Transactions" tabs. If they are not present, enable them in the plugin manager

4.Create a new solidity file in remix, named mood.sol

5.Write the contract

- Specify the solidity version and add a license
// SPDX-License-Identifier: MIT pragma solidity ^0.8.1;
- Define the contract
``` contract MoodDiary{

 }
- Inside the contract create a variable called mood
string mood; Next, create Read and Write functions
//create a function that writes a mood to the smart contract
function setMood(string memory _mood) public{
   mood = _mood;
}

//create a function the reads the mood from the smart contract
function getMood() public view returns(string memory){
   return mood;
}
And that's it! Your code should look like this 6.Deploy the contract on the Ropsten Testnet.
Make sure your Metamask is connected to the Ropsten Testnet.
- Make sure you select the right compiler version to match the solidity contract. (In the compile tab)
- Compile the code using the "Solidity Compiler" tab. Note that it may take a moment to load the compiler
- Deploy the contract under the "Deploy and Run Transactions" tab
- Under the Deployed Contracts section, you can test out your functions on the Remix Run tab to make sure your contract works as expected!
Be sure to deploy on Ropsten via Remix under the Injected Web3 environment and confirm the deployment transaction in Metamask
Make a new temporary file to hold:
- The deployed contract's address
- Copy it via the copy button next to the deployed contracts pulldown in remix's Run tab
- The contract ABI (what is that?)
- Copy it via the copy button under to the contract in remix's Compile tab (also in Details)
Connect Your Webpage to Your Smart Contract
Back in your local text editor in index.html, add the following code to your html page:
1.Import the Ethers.js source into your index.html page inside a new set of script tags:
<script
  src="https://cdn.ethers.io/lib/ethers-5.2.umd.min.js"
  type="application/javascript"
></script>

<script>
  ////////////////////
  //ADD YOUR CODE HERE
  ////////////////////
</script>
2.Inside the script tag, import the contract ABI (what is that?) and specify the contract address on our provider's blockchain:
  const MoodContractAddress = "<contract address>";
  const MoodContractABI = <contract ABI>
  let MoodContract;
  let signer;
For the contract ABI, we want to specifically navigate to the JSON Section. We need to describe our smart contract in JSON format.
Since we have two methods, this should start as an array, with 2 objects:
const MoodContractABI = [{}, {}]
From the above page, each object should have the following fields: constant, inputs, name, outputs, payable, stateMutability and type.
For setMood, we describe each field below:
- name: setMood, self explanatory
- type: function, self explanatory
- constant: should be false because this is a function that updates data
- outputs: should be [] because this does not return anything
- stateMutability: This is nonpayable because this function does not accept Ether
- payable: 'false` since this does not accept Ether
- inputs: this is an array of inputs to the function. Each object in the array should have internalType, name and type, and these are string, _mood and string respectively
For getMood, we describe each field below:
- name: getMood, self explanatory
- type: function, self explanatory
- constant: should be true because this is a function that retrieves data. Even though this is a function, it is basically a getter
- outputs: this has the same type as inputs in setMood. For internalType, name and type, this should be string, "", and string respectively
- stateMutability: This is view because this is a view function
- payable: 'false` since this does not accept Ether
- inputs: this has no arguments so this should be []
Your end result should look like this:
const MoodContractABI = [ { "constant": true, "inputs": [], "name": "getMood", "outputs": [ { "internalType": "string", "name": "", "type": "string" } ], "payable": false, "stateMutability": "view", "type": "function" }, { "constant": false, "inputs": [ { "internalType": "string", "name": "_mood", "type": "string" } ], "name": "setMood", "outputs": [], "payable": false, "stateMutability": "nonpayable", "type": "function" } ]const provider = new ethers.providers.Web3Provider(window.ethereum, "ropsten");
provider.send("eth_requestAccounts", []).then(() => {
  provider.listAccounts().then((accounts) => {
    signer = provider.getSigner(accounts[0]);
    MoodContract = new ethers.Contract(
      MoodContractAddress,
      MoodContractABI,
      signer
    );
  });
});
5.Create asynchronous functions to call your smart contract functions
async function getMood() {
  const getMoodPromise = MoodContract.getMood();
  const Mood = await getMoodPromise;
  console.log(Mood);
}

async function setMood() {
  const mood = document.getElementById("mood").value;
  const setMoodPromise = MoodContract.setMood(mood);
  await setMoodPromise;
}
6.Connect your functions to your html buttons
<button onclick="getMood()">Get Mood</button>
<button onclick="setMood()">Set Mood</button>
Test Your Work Out!
- Got your webserver up? Go to http://127.0.0.1:3000/ in your browser to see your page!
- Test your functions and approve the transactions as needed through Metamask. Note block times are ~15 seconds... so wait a bit to read the state of the blockchain
- See your contract and transaction info via https://ropsten.etherscan.io/
- Open a console (Ctrl + Shift + i) in the browser to see the magic happen as you press those buttons
DONE!
Celebrate! You just made a webpage that interacted with a real live Ethereum testnet on the internet! That is not something many folks can say they have done!
If you had trouble with the tutorial, you can try out the example app provided.
git clone https://github.com/LearnWeb3DAO/BasicFrontEndTutorial.git
cd BasicFrontEndTutorial
lite-server